
Specialty contractors often provide subcontractor work by using their own equipment. This creates a complex, multiple tiered need for integration between the technician, accounting and the customer. The ability to provide efficient and high-quality service to your customers gives you an advantage over the competition.
But now you can streamline your field operations with a strong software platform, such as Acumatica. By integrating accounting and payroll with the teams in the field, your company delivers proven efficiencies for employees and customers. Here are some key areas where the right tech tool will significantly improve your customer satisfaction levels with regards to field service management. In this article, you will learn how to improve profits and customer satisfaction with Acumatica.
Mobility in the field
Often, companies who provide service work don’t have a mobile solution for their technicians, meaning clipboards and paperwork are the reality. Eliminating paperwork for time sheets and service work really reduces the risk of double entry errors occurring. Mobility also means every piece of documentation presented to your customer digitally shows the customer a commitment to service excellence.
Imagine the time-savings when a technician in the field, working on a piece of equipment can log time and locate tools just from a smartphone or tablet. What a great way to impress customers with prompt and comprehensive service.
Maximizing field technicians’ time
Routine and preventative maintenance can be scheduled in advance to maximize your technicians’ time. But things come up to upset that schedule all the time. Emergencies must take priority over regularly scheduled service work which can make juggling your technician’s time challenging. Vehicles, tools and inventory need to be available when and where they’re needed. What if your dispatch team could see responses to emergencies and route the technicians for any change in priorities? Yet another way you to generate customer loyalty.
Prompt and accurate invoicing
Billing in a timely manner means you get paid in a timely manner. A full integration between field operations and accounting is so important for this reason. That same mobility that we spoke of before comes into play here. With an integrated solution, field service teams can submit completed jobs immediately to accounting from the field. Enabling your office team to have the information in real-time and turn around accurate invoices fast.
The company that embraces field service work will leverage it as a profit center. Acumatica Field Service is a comprehensive system that is highly customizable. Get scheduling, dispatching, inventory management, accounting, and analysis. Make your field service business effective and deliver the highest level of customer service possible. Because Aktion Associates is a Value-Added Reseller of Acumatica, we’d love to show you this powerful real cloud technology so you can get your field service operations harnessed to make money now and into the future.
Join us for the next Acumatica User Forum focused on Warehouse Management (WMS). Acumatica WMS extends Order Management and Inventory Management with barcode scanning for warehouse and inventory transactions. Accurately and efficiently manage your advanced warehouse needs in multiple industries.
Join us to learn how to more effectively manage your advanced warehouse needs.
We truly value our Acumatica customers. When you attend this event, you will receive a Grubhub voucher as a token of our appreciation.
Join us for the next Acumatica User Forum. During this event, you’ll learn how to set up workflow automations and escalations within your Acumatica software.
We truly value our Acumatica customers. When you register for this event, you’ll also receive a Grubhub voucher as a token of our appreciation.
Join us for the next Acumatica User Forum webinar covering Fixed Asset Management Software, which lets you create accurate financial reports, maximize tax benefits, and meet compliance requirements.
For previous User Forum events covering and other Acumatica tips and tricks, go to our Acumatica Video Resource page. Be sure to like and subscribe to our Acumatica User Forum Playlist on YouTube.
We truly value our Acumatica customers. When you register for this event, you’ll also receive a Grubhub voucher as a token of our appreciation.
Join us for the next Acumatica User Forum to learn how to modify and customize Financial Statements in Acumatica ERP.
For previous User Forum events covering and other Acumatica tips and tricks, go to our Acumatica Video Resource page. Be sure to like and subscribe to our Acumatica User Forum Playlist on YouTube.
We truly value our Acumatica customers. When you register for this event, you’ll also receive a Grubhub voucher as a token of our appreciation.
Join us for the next Acumatica User Forum to learn how to set up and use the Taxes subledger of Acumatica ERP for maintaining sales and use taxes. The current version of the course is valid for Acumatica ERP 2022 R1.
For previous User Forum events covering and other Acumatica tips and tricks, go to our Acumatica Video Resource page. Be sure to like and subscribe to our Acumatica User Forum Playlist on YouTube.
We truly value our Acumatica customers. When you register for this event, you’ll also receive a Grubhub voucher as a token of our appreciation.
If you have your own custom code extensions or common libraries that are generic enough for sharing across Acumatica modules, customization projects, or even instances; this solution is also a great option for reusing your own Acumatica custom extended libraries by creating NuGet packages for them.
Introduction
Seasoned developers are probably aware of the benefits of using a package manager tool for installation and updates of packaged reference files and libraries. Such packages contain reusable code that are published to a central repository for consuming by other programs. The advantages to using such a tool is to maintain any common code in a common location, rather than needing to copy the individual files around and maintain their versions separately and manually. There are many public package managers available for different languages, frameworks, and platforms; such as the popular NuGet, npm, Bower, and yarn. This article focuses on the usage of NuGet because it is the standard package manager for Microsoft.NET – the platform used for Acumatica and its customizations.
Since I began developing customizations in Acumatica five years ago, and also coming from a deep .NET and client/server full-stack background, I’ve always wanted the Acumatica common libraries to be available as a package and have wondered why such packages weren’t already readily available. I have long wanted to fill this void myself in order to simplify the referencing of these libraries for our own custom code extension libraries. I recently was able to set this up for our company, Aktion Associates (an Acumatica VAR and Gold Certified Partner), and I’d like to share with you how this can be accomplished.
What is NuGet?
Stepping back for a moment, NuGet is a .NET package manager that’s integrated with Visual Studio.NET – the Microsoft development environment integrated and recommended for use to author code extensions for Acumatica customizations. NuGet is used to create and share reusable packages from a designated public or private host. https://www.nuget.org/ is the main NuGet Gallery repository to which public packages can be published, and from which .NET projects can consume. Popular packages such as Json.NET – a JSON parser and serializer – can be found here, as well as Microsoft.NET framework packages, and many others. Instead of searching the web for an installation program or the specific download file you need for a third-party library, NuGet can be used to retrieve and install the appropriate package of files and the version required simply by selecting it from its public host. NuGet can also be used for packages hosted privately for use internally for yourself or your company. Since Acumatica libraries are not available publicly via nuget.org, this article explains setting up these common libraries as private packages for use in your own customization projects.
There are many more guidelines for using and configuring NuGet that can be found within its documentation found at https://docs.microsoft.com/en-us/nuget than what is described here.
Using NuGet with Acumatica
To reference a NuGet package in your own customization extended library’s Visual Studio project, open your project in Visual Studio, right-click on the project’s References node in the Solution Explorer, and select the Manage NuGet Packages context menu option. This will open a window like the image in Figure 1, which displays NuGet packages already installed, and those available for install. If you Browse for “Newtonsoft.Json”, for example, from nuget.org, it should display that package in the results. When you select a package, you can then choose a specific version available from the specified package host and install it. That package will then show under your project references and its files can be referenced within your extended code. See Figure 2 for an example of referencing the Json.NET library in a C# Visual Studio project after installing it via NuGet.
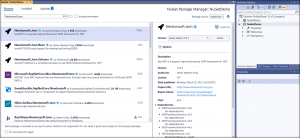
Figure 1: NuGet Package Manager in Visual Studio

Figure 2: Referencing Json.NET after installing as a reference
The advantage to referencing libraries via NuGet like this is the simplicity, and allowing it to manage libraries and their versions without needing to do so manually. To then install a newer version of the library, you open the NuGet Package Manager again in Visual Studio from Figure 1, change the version to another available version, and Update. This is how I’d like Acumatica common library references to behave, and which is now possible with the solution outlined below.
Creating a NuGet Package
The first step is to create a NuGet package containing common Acumatica libraries. These common libraries are the most often used when writing a code extension in an external library. They include the following:
I also like to include PX.Data.BQL.Fluent.dll because I prefer using Fluent BQL syntax within code.
The Package Manifest
A NuGet package manifest is created by defining the contents in a .nuspec XML file. The schema for a .nuspec file can be found within its documentation at https://docs.microsoft.com/en-us/nuget/reference/nuspec. The following XML shows an example of the contents of a .nuspec file (e.g. Acumatica.nuspec) for the Acumatica libraries mentioned above.
(Acumatica.nuspec contents)
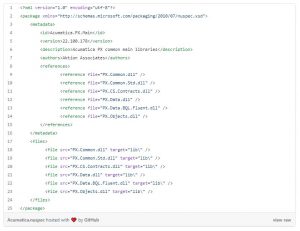
GIST: https://gist.github.com/tlanzer-aktion/e76f8bc275cc3415344a1183666e59b5
Within this XML, the package is supplied a name (<id>) and a version (<version>), the files to reference in the destination Visual Studio project (<references>), and the source files to include in the package (<files>). Notice in this example that I’m naming the package Acumatica.PX.Main, and I’m including Acumatica build version 22.100.178 of its libraries.
Creating the Package
The next step is to create the package from the .nuspec package manifest. You can download nuget.exe from https://www.nuget.org/downloads, which is a command-line program used to create a NuGet package from a NuGet manifest. On the command line, the syntax to create the example package using nuget.exe is:
nuget pack Acumatica.nuspec -NoPackageAnalysis
This syntax assumes that both nuget.exe and Acumatica.nuspec is accessible within the current path, so if not, the path for one or both should be specified. The resulting package created from the example should be Acumatica.PX.Main.22.100.178.nupkg.
Additional Package Versions
Now that we have one build version of Acumatica’s common libraries packaged, you can continue creating additional versions as needed or as they are released by Acumatica. To create a new package for the following build version – 22.101.85 – you can repeat the instructions above but replace the version number and include that version of the libraries. You should then end up with a new package named Acumatica.PX.Main.22.101.85.nupkg, and so on.
Setting Up a NuGet Feed
To make a package available for project reference, it needs to be published to a NuGet feed. Since the package is meant for your own consumption, you’ll want to create a private feed for yourself or your organization. A private feed can be a local file share or server, or a remote private hosting service like Azure Artifacts or GitHub Package Registry. At Aktion Associates we use Azure DevOps as our source control repository, so we use Azure Artifacts as our feed host, and this will also be used for examples in this article.
Creating the Feed
To create a NuGet Feed in Azure Artifacts, open the Azure DevOps project in which you want to create a feed and choose Create Feed on the main Artifacts page. The dialog shown in Figure 3 should open. After naming and configuring the feed according to the visibility and scope of your needs, create the feed.
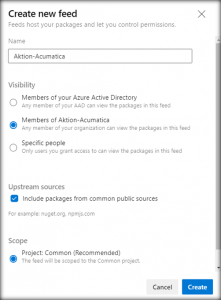
Figure 3: Create New Feed dialog
Publishing to the Feed
Now that you have both a NuGet package and a NuGet feed set up, you can publish the package to the feed. On the main Azure Artifacts page, choose Connect to Feed, then select NuGet.exe as the connection type, and copy the new feed URL shown. Then, on the command line, the syntax to publish the example package using nuget.exe is:
nuget push -Source <feed url> -ApiKey <any string> Acumatica.PX.Main.22.100.178.nupkg
This syntax assumes that both nuget.exe and Acumatica.PX.Main.22.100.178.nupkg is accessible within the current path, so if not, the path for one or both should be specified. The specified package should now be published to the feed and be accessible for referencing according to the configuration of your feed. Figure 4 shows an example private feed and package inside Azure Artifacts after creation and publishing.
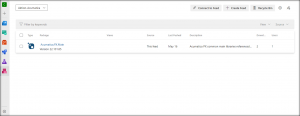
Figure 4: Feed created in Azure Artifacts
Using Your NuGet Feed
After publishing your packages to your NuGet feed, you should be able to then reference the package and version from your feed inside your Visual Studio project as described in Using NuGet with Acumatica. In the NuGet Package Manager, add your new package source (i.e. the NuGet feed you created) from the Options dialog opened from the gear icon next to the Package source dropdown. After adding the feed, the published package should display in the list of available packages. Select the package in the list, and then the different published versions should be available in the Version dropdown to choose for installation or update. See Figure 5 for an example of what the Package Manager shows after selecting the package (e.g. Acumatica.PX.Main) in your new NuGet feed.
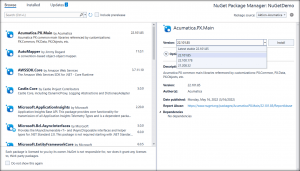
Figure 5: Selecting a NuGet package and version
Once you choose a package and appropriate version, installing or updating it creates reference to that package’s library versions in your Visual Studio project. See Figure 6 for an example of a C# Visual Studio project after installing the Acumatica.PX.Main NuGet package from a NuGet feed.
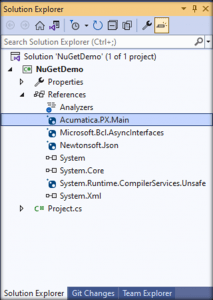
Figure 6: Visual Studio project after package installation
Other Acumatica Libraries
You can take this solution further and create additional NuGet packages for other commonly used Acumatica libraries like PX.Api, PX.Caching, PX.Web, etc. and repeat the steps mentioned above for these. Once those packages are created and published to your feed, you will also be able to reference these in the same manner.
Your Own Packages
If you have your own custom code extensions or common libraries that are generic enough for sharing across Acumatica modules, customization projects, or even instances; this solution is also a great option for reusing your own Acumatica custom extended libraries by creating NuGet packages for them. For example, Aktion has our own API custom library which adapts the existing Acumatica API to our own best practices for integration and communication, and we share it across projects via our own private feed.
Summary
I hope you find this solution for setting up a NuGet feed for Acumatica library packages useful, and I’d love to hear from you and how you’ve put it into use or adapted it for your own needs. It does require a bit of maintenance to keep package versions updated in your feed, but the efficiency gained by easily referencing and consuming an appropriate library version for your customizations and upgrade needs is substantial and valuable.
Happy Coding!
A new retail delivery fee took effect in Colorado on July 1, 2022. Retailers will have to collect the $0.27 fee every time they deliver taxable goods to a Colorado address. This will add a layer of compliance complexity for both in-state and out-of-state retailers.
The $0.27 fee, which will be adjusted for inflation, applies to retailers selling taxable tangible goods for delivery by motor vehicle to Colorado consumers, no matter who owns or operates the vehicle used to make the delivery, and whether the delivery originates in Colorado or another state.
Given the number of Prime (and other) delivery trucks zipping around neighborhoods daily, this could be quite lucrative for the state. In fact, it’s expected to generate $16.8 million during fiscal year 2022–23 and $18.8 million in FY 2023–24. Serious online shoppers may feel it the most; though collected and remitted by retailers, the fee is imposed on purchasers.
Businesses subject to the new retail delivery fee — i.e., any retailer registered to make taxable retail sales in Colorado that makes sales for delivery — must register to collect and remit the fee. If you don’t make any sales of taxable tangible property for delivery into Colorado, you’re not required to register.
The Colorado Department of Revenue has confirmed that a person who does not have nexus and therefore does not meet the requirements to collect sales tax is also not required to collect the retail delivery fee.
There’s no license or registration fee, but retailers will need to add a retail delivery fee account through the Colorado Department of Revenue. Information on how to do that will be forthcoming.
Every retailer with a retail delivery fee account will need to separately report the fee on a retail delivery fee return (form DR 1786). Returns are due every reporting period, at the same time as the state sales tax return, even if no deliveries into the state were made during that time.
If there are any silver linings, it’s that only one return will be required for the entire state and electronic filing and payment options will be available.
Fee must be separately stated
Retailers must separately state the retail delivery fee on all customer invoices and receipts.
The fee doesn’t apply when otherwise taxable goods are delivered to a purchaser exempt from the state sales tax, such as a government or charitable organization.
Likewise, the fee doesn’t apply to deliveries of nontaxable goods, including wholesale sales, so long as all the property delivered is exempt from the state sales tax. If a delivery includes both taxable and exempt goods, the delivery fee will apply.
The retail delivery fee is just one of several new fees created by the enactment of Senate Bill 21-260. Others include:
“Funding highway and road construction and maintenance comes mostly from taxes on motor fuel and fees imposed on motor vehicle ownership,” says Scott Peterson, vice president of Government Relations at Avalara. “The tax on motor fuel isn’t a long-term option given the ever-increasing use of electric vehicles and miles per gallon. Many states are studying and talking about how to solve the problem, but Colorado may be the first state to broaden the revenue mix to provide long-term funding. The challenge is the administrative cost it imposes on the businesses that must collect the fees.”
Automating tax collection and remittance can help reduce the burden on businesses. If you currently use Avalara AvaTax and want to learn how it will support the Colorado retail fee, check out the Avalara Help Center.
Join us for the next Acumatica User Forum event exploring how to better use CRM within Acumatica. Acumatica CRM provides a consolidated view of all customer records in a single database, so every member of your team has a 360-degree view of all customer activities and records, and management has real-time insight into performance.
For previous User Forum events covering and other Acumatica tips and tricks, go to our Acumatica Video Resource page. Be sure to like and subscribe to our Acumatica User Forum Playlist on YouTube.
We truly value our Acumatica customers. When you register for this event, you’ll also receive a Grubhub voucher as a token of our appreciation.
Join us for an upcoming Acumatica User Forum event focused on the customizations and their packaging, publishing and storage within Acumatica. For those who attend this event, Aktion will also be offering a valuable document titled “Customizing, Packaging, and Publishing: Best Practices for Acumatica.”
For previous User Forum events covering and other Acumatica tips and tricks, go to our Acumatica Video Resource page. Be sure to also like and subscribe to our Acumatica User Forum Playlist on YouTube.